Ecuador's DVD-2-DivX Guide for beginners
v2.3
Last Update : February 1 2003
Homepage
: http://www.ecuadors.net
Contents
1. Introduction
This guide is intended for beginners. It describes one of the
easiest methods of converting DVD's to MPEG 4 (DivX) AVI
files with subtitles and MP3 Dolby Surround sound that will
fit on 1 or 2 CD's.
The method uses XMPEG (improved version of FlaskMPEG) )for conversion
and has the following advantages:
- Easy to set-up, easy to use.
- Excellent compression (using the built-in DivX 5 2-pass).
- Great speed.
- Good sound (Dolby Surround) for 1-CD rips.
- No problems with sound synchronization.
- Output AVI plays on any media player as long as MP3 and DivX are installed.
And a few disadvantages:
- 2+ CD rips would be better with AC3 sound, a process that
is not covered by this guide.
- No de-interlacing.
Notice:
Some extra info in red is not essential
to the process. Skip these sections until you are somewhat experienced.
CPU: For smooth playback you will need at least a PII-350
or K6-2 450. As for ripping, the faster the system the better for you.
For example, a 2 hour movie takes about 4.5 hours of processing
on an Athlon XP 1600+.
RAM: As most modern systems come with 128MB or
more there is no problem. Even 64MB RAM on Win 9x should be ok.
DVD: Virtually any DVD drive wll do fine. Of course,
a region free drive is a plus. Also, if you have a slow DVD drive (up to 4x)
and a fast system (1GHz+) you could consider converting directly from the
DVD, but only if you don't have enough free disk space.
Hard Disk: A DVD will require about 3-8 GB of
space on the hard disk for the ripping phase. An additional 2-4 GB's
are required for the conversion. If you don't have that
much free space you could consider skipping the ripping phase and converting
directly from the DVD, but that would be extra strain on your DVD drive, as
it will have to read for several hours. If your DVD drive is fast (8x or more)
you don't have this option as the drive will have to speed up and slow down
continuously in order to maintain a slow reading speed, a process that could
easily damage the drive.
SVGA: An overlay capable SVGA card is required (almost
all 8MB+ cards will do, as well as several 4MB units). Best cards for video
are ATI cards.
II.
Software Requirements
OS: Most Windows OS's (Win 98, ME, 2k or XP) are ok.
I prefer Windows XP (the screenshots are on Win XP). I don't know if Win 95
will suffice.
-
DivX 5.0.3 Codec, which you will downloaded from
the
DivXNetworks site.
Be sure to download the ad-supported
Pro version. The download is
about 3MB and includes the rather useless at the moment DivX Alpha player.
- Ecuador's AVI Bitrate Calculator VB Support Files (on some systems).
If you encounter an error when launching the Aspect Ratio calculator or
the WAV normalizer, then you are missing some required VB shared files. You
can download a package that will install these for you from my ABC
page. Note that you will only have to do this once for any version of
my calculator or rip pack that you ever install.
Optional Programs:
-
If you want to change the region of your DVD-ROM drive
then I would suggest that you download
DVDGenie from
DVD
infomatrix.
-
BSPlayer
0.85. This media player is much better suited for DivX media than
Microsoft Media Player.
3. Installation
Make sure you have at least DirectX 7 installed on your
system. You probably have them if you have been playing some recent 3D games.
If not, download them from Microsoft.com.
If you have downloaded Ecuador's DVD-2-DivX Rippack 2.3
then installation is very easy. Just double click setup.exe and install
with the selected options. If you are using Windows 2000 or XP and
DVDDecrypter reports an ASPI layer not found error, then re-run
setup.exe, uncheck everything and check NERO ASPI Library. The
Rippack installer will create start-menu shortcuts for all required programs.
Install the DivX 5.0.3 Pro codec that you downloaded
from the DivXNetworks site. After the installation run Ecuador's ABC 2.91
and press "DivX 5 spyware disabler". After rebooting you
should have no ads, yet a fully functional DivX Pro codec.
As I mentioned earlier you need to have a software DVD player
installed (e.g. PowerDVD).
4. Ripping
Insert your DVD disk in the drive and press play on your software
DVD player. When playback begins, authentication is complete and you can close
the player software. Also, it would be useful to note the length of the movie
(hours, mins, secs), as that will be used later.
Note, that you may decide to remove parts
you don't want like the end credits. In that case substract the parts you
are going to skip from the length of the movie.
You could theoretically skip this phase
if you have a slow DVD drive, but if you have enough hard disk space you really
shouldn't.
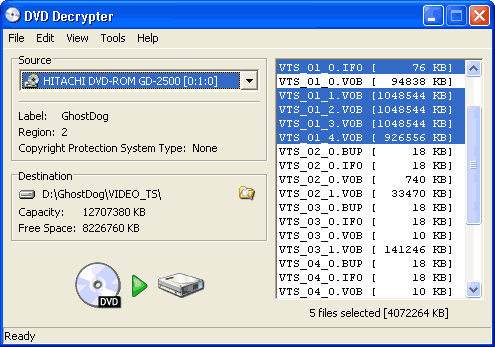 |
Start DVD Decrypter. If an "ASPI not found"
error occurs under Win 2k/XP you need a working ASPI layer. Try the
one included in my rippack.
Each DVD contains one or more titles.
Each title consists of several files:
One VTS_XX_0.IFO file and several
VTS_XX_Y.VOB files, where XX is the title number and Y is the VOB file
index number starting from 0. VTS_XX_0.VOB and VTS_XX_0.BUP are not
important, but all the other files have to be copied to the same folder
on the disk.
For your convenience, DVD Decrypter will try to choose
all the files that contain the movie for you. If you want to convert
the movie and not the extras the automatic selection will most probably
work and all you have to do is to press the large DVD to HD button
on the lower left.
If you check all the files and copy
them to your hard disk then you can use PowerDVD 4's "Open DVD
file from Hard Disk" option (and select VIDEO_TS.IFO) to view the
movie without the disk.
|
5. Bitrate
Calculation
You should know the duration of the movie you wish to convert.
You either already know that, as described in step 4-I, or you can
find it out with XMPEG as described in step 6-I.
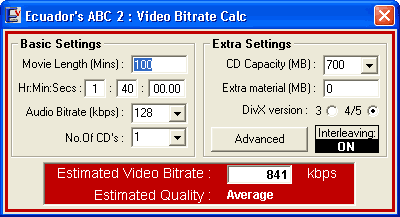 |
Start Ecuador's AVI Bitrate calculator. Press the red (video
bitrate) button.
- Enter the duration of the movie in minutes (or in HH:MM:SS
format).
- Select an audio bitrate. If you don't know what to use, leave
it at 128kbps.
- Choose the number of CD's (1CD recommended for less
than 2 hours) and their capacity (you could be using
650MB or 700MB CD-R media). I
suggest you use 700MB CD-R's if possible, as the extra 50MB
could make a difference in quality.
- Make sure you have chosen DivX version 4/5.
After you' ve entered all info you should be given the estimated
video bitrate. Make a note of it, as you will be needing it later
on.
|
We have chosen an audio bitrate of 128kbps
which is considered to be good quality audio. However, the calculator gives
you a large estimated video bitrate (e.g. 1000kbps or more) you could
use higher quality audio of 160, 192 or even 224 kbps.
On the other hand, there are some cases (for example very low video bitrate)
where you want to use less disk space for the audio. In those cases you could
use 112 or 96kbps. You should not go below 96kbps for
stereo mp3, or the quality will be very poor.
Also, if you want to save a couple of
megabytes that are used for the AVI file structure, you could change the "Advanced"
interleaving settings to a larger value (e.g. interleave audio every 10
frames). You will use these settings later in VirtualDub.
6. Video
Conversion
I.
Loading movie in XMPEG
 |
Please remember that the first time you will run XMPEG it will run
an iDCT test that will take some time to finish. Do not terminate
the program, just wait a few minutes and it will finish.
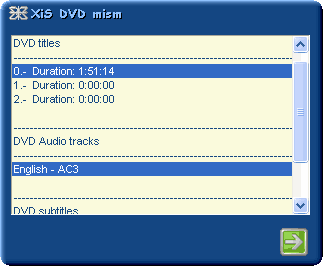
Start XMPEG. Go to File-->Open Media and
locate the .ifo file you have copied to your hard disk. If
you are converting directly from the DVD choose "XiS DVD Mism"
from the File Type drop-down list and then find the appropriate .ifo
file on the DVD (it will be the one followed by the most similarly
numbered .vob files).
You should see a window similar to the one on the left. Choose the
corect title (usually the longest one). If there are two titles with
the same duration, the first one should work fine. Choose an audio
track and subtitles (if you want any on the final video).
The subtitles you select here will be locked on the video. If you
prefer to have subtitles on a different file and show them only if
you want to, you can download subtitles from sites like http://dvd.box.sk
and view them with DivX players like BSPlayer.
After pressing the green button a movie window should appear allong
with a control panel.
|
 |
The control panel has a large slider for easy navigation through the
movie. Pressing the ">>" button on the lower
right will reveal some details of the video. Make a note of the "Detected
FPS" value. For PAL (R2) DVD's you don't have to check, as
it will always be 25. |
At this point you should use the slider to move to a "fast"
scene and press the play button. There are a few DVD's that use interlaced
video (older ones and very few) that will have black horizontal bars on
fast moving objects. This version of XMPEG cannot remove the black
bars (deinterlacing). The only solution is to either use an other program
than XMPEG (and another guide) or later on, when setting a resolution
use half vertical resolution. That means 288pixels for PAL
or 240pixels for NTSC.
This is also a good time to check if the subtitles are displayed.
Again go to a scene where there should be subtitles and press the play button.
If you have subtitles it would be good to remember where they appear so
as not to cut them out later on when you are removing any black bars.
II.
Setting Output Format (Codecs)
Go to "Options"-->"Output
Format Options". The AVIPlugin window will come up where
you will be able to choose audio and video codecs:
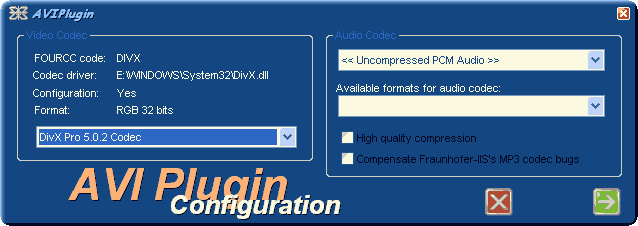
For audio, leave it to "Uncompressed PCM".
You could choose to compress directly
to MP3 (by selecting the MPEG Layer 3 codec) and check the two
boxes below (High quality... and Compensate...), but that sometime causes
problems. Moreover you would have to rely on XMPEG's built-in normalization
which is rather slow. So, I suggest to beginners to use uncompressed
audio at this point to avoid any problems. If direct encoding to MP3
works for you and you prefer it, go for it.
From the Video Codec dropdown list select "DivX
Pro 5.0.3". The DivX Pro 5 configuration panel will
come up.
III.
Setting up DivX Pro 5
The 5.0.3 pro version of the DivX
codec features a new "multipass" mode which allows more than
2 encoding passes, improving quality. In reality, after the third pass
the difference, if any, is not worth the extra time, although the 3rd
pass is a slightly perceivable improvement over the original 2-pass
method for those who wish to do the extra work.
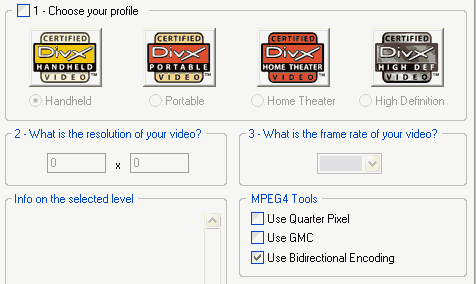 |
*Profiles Tab
Uncheck the "Choose your profile" box so that you can
use your own settings and on't worry about the warning.
MPEG4 Tools :
- Quarter Pixel : Usually works well when the movie is
displayed on TV Monitor. For most cases DON'T use it.
- GMC (Global Motion Compensation) : A very small gain
in compression / quality, but could cause visual problems on
a few rare occasions so, generally DON'T use it. Another
reason not to use it is that GMC might prevent your clips from
being played on some future ISO-MPEG 4 home players.
- Bidirectional Encoding (B-Frames) : Unlike GMC, this
option results in great compression / quality gain (and
is ISO MPEG 4 compliant) so DO use it. Of course, the
compression speed will be significantly slower, but it is worth
it.
|
|
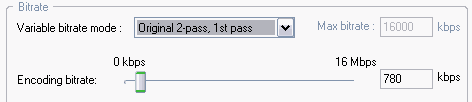
*Bitrate Control Tab
Select VBR mode "Original 2-pass, first pass".
Enter the bitrate you got from Ecuador's ABC 2 (step 5) or
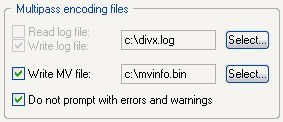
a bit lower (e.g. 780 instead of 787) to be on the safe side. Check
"Write MV file" for a speed gain during the second
pass.
The "multipass" method seems
to give worse results at 2-passes than the "Original"
method. Of course you can go for 3 passes which will require you
to run XMPEG once more after the 2 passes. So, for the "multipass"
method select "multipass, 1st pass".
|
|
|
|
*General Parameters Tab
Leave the default settings (all boxes unchecked,
Performance/quality : "slowest").
Press ok on the DivX control panel and the Green
Arrow on XMPEG's AVIPlugin window for the settings to be accepted.
Most DVD movies will appear quite dark. There is a way to
correct this.
 |
Go to Options-->Luminance. Check "Enable".
Now you can set the sliders to your preferred settings while seeing
the result on the movie window. Gain is something like your
TV's contrast setting while Offset is like the brightness
setting (more usefull for dark movies).
There is no correct value but for most movies I use a Gain of
7-12 and an Offset of 16-23.
|
V.
Setting Global Project Options
Go to Options-->Global Project Options.
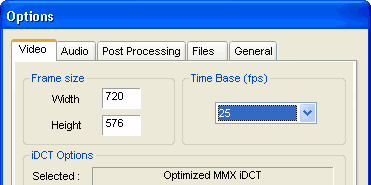 |
*Video Tab:
Here you have to select the Time Base (fps). You have
made a note of the correct value on step 6-I.
The iDCT options affect the speed and quality of the conversions.
My personal favorite is the Optimized MMX iDCT which is
very fast on my Athlon XP.
The frame size will be set up later on and deinterlacing
should not be checked (as it doesn't actually work).
|
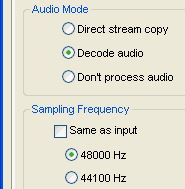 |
*Audio Tab:
Just use the settings you see on the left (decode
audio, 48000 Hz).
If you plan to export the
audio to WAV and normalize it separately, you can choose "Don't
process audio" here. After completing the video compression,
return to this tab and choose "Decode audio - 48000Hz"
(to make sure XMPEG does note default to 44100Hz). Then, execute
step "IV" (audio settings) and finally go to menu "Run...-->Extract
Audio to...-->WAV". You will have a separate WAV file
without having to extract it through VirtualDub.
|
*Post Processing Tab:
Some of the most important settings lie in this window.
 |
Make sure you have YV12 Format checked, or you will lose significant
speed during the conversion. Then, you have to select a filter. The
filter will affect the speed and the quality of the resizing. Some
people prefer bressenham, others bicubic. I always use
MMX Bilinear which is similar to but faster than bressenham
and crisper than bicubic.
Also, remember the Input Aspect Ratio. It will either be 16:9
or 4:3. You will need it for resizing. Make sure "Keep aspect
ratio" is unchecked.
Note that aspect ratio setting don't work in
this version of XMPEG. That is why we will set it manualy on
the next step.
|
Now it is time to set up resizing and cropping. Press the
"Show output pad" button.
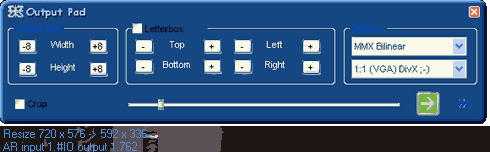 |
- First, you will resize the video.
You need to maintain the aspect ratio of 1.33:1 (4:3) or 1.778:1
(16:9) of the DVD. At the top left of the preview window the AR
input should indicate the aspect ratio. Note that due to a bug, 1.778
is sometimes displayed as "1.#IO".
Use the "Output Size" buttons to resize the video,
trying to keep the output aspect ratio close to the AR input.
|
For your convenience, you can start "Ecuador's ABC
2" and use the resolution /AR calculator. Choose the movie
aspect ratio from the "standard" drop down menu and move
the horizontal resolution slider to somewhere between 560 and 640.
Use the resolution setings to resize the preview in the output pad. If you
won't crop the edges afterwards, make sure you have a resolution that is
a multiple of 16 for both axes. If you plan to crop the black bars, you
don't have to obey to this this limitation now. You will obey i though,
when you do the cropping.
560-640
horizontal resolution is a good setting for about 700-1200 kbps video.
If you use a smaller bit rate try a lower resolution. If you prefer a greater
resolution (704-720 horizontal) you should use at bitrate of about
1500 or more. The most common mistake newbies commit is choosing
a greater resolution than they should (usualy full 720x576 or 480 without
even fixing the aspect ratio). If there is not enough bitrate to support
that resolution big blocks will appear, degrading the overall quality.
- Next, you may crop the video if needed.
After resizing there could be black bars above and below the video (or even
the sides). You should cut them out, but with care if you are using subtitles.
If you are at a dark part of the movie and you cannot make out the edge of the
movie, use the horizontal slider to go to a brighter part. So, check the "Crop"
box and use your mouse to drag the dashed lines. A quick way to automatically
adjust cropping is to press the ">>" button and select
"autocrop".
The dashed lines mark the final output video, and the resolution is displayed
on the top left of the preview (third row). Cropping does not affect the aspect
ratio, but you still need to use multiples of 16 for the resolution.
You can use the resolution /AR calculator with the Free Aspect Ratio
setting to quickly find the closest multiple of 16.
Upon finishing press the Green Arrow to accept the
settings.
Enter the target file names here.
Check "Compile whole file", "Overlay"
and "2nd Pass enabled". Press 2nd Pass Plugin Settings.
The AVIPlugin window will come up.
Select video codec "DivX Pro 5.0.3" once more for
the DivX control panel to come up. Make sure you have the exact same
settings as step 6-III except the VBR mode, which should
now be "Original 2-pass, second pass". Check "Do
not prompt..." for the process to complete without any input.
If you decide to use the "multipass"
method for a third pass, then select here "multipass, nth pass".
After the process is completed, you have to uncheck "2nd Pass
enabled" and select "multipass, nth pass"
as the OUTPUT FORMAT settings (step 6-III).
Press ok on the DivX control panel, the Green Arrow on
XMPEG's AVIPlugin and ok on the XMPEG Global Project Options panel
for the settings to be accepted.
Go to Run...-->Audio Player. The audio
track will start playing and the following panel will appear :
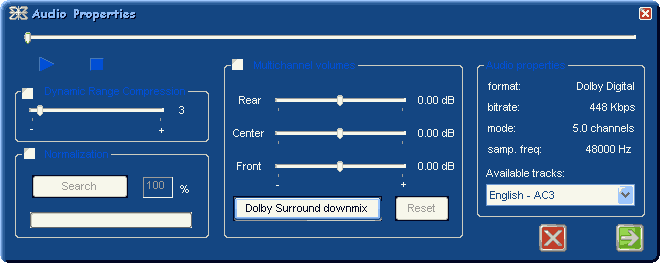
Choose the correct language from the available tracks (you
should listen to it to make sure). Sometimes the Audio properties don't
appear correctly, so even if the correct language is selected by default,
click to select it again and the properties will refresh. Now, take a look
at mode. If you have more than two channels (e.g. 5.0 channels)
make sure the "Dolby Surround downmix" is pressed (or looks
lighter coloured for Win XP). If you don't have multi-channel audio (e.g.
2.0 channels) make sure "Dolby Surround downmix"
is unpressed. "Normalization" and "Dynamic Range..."
should not be checked.
If on step 6-II you chose the
MP3 Codec, you should use XMPEG's Normalization. So, check the appropriate
box and press "Search". Wait for a few (or more :) minutes until
the progress bar has reached the end.
I have seen some guides using the Dynamic
Range Compression. While the result might sound better (dialogues and
other quiet parts sounding louder) the process in fact partly destroys the
director's and the sound engineer's work on the sound. If the director intended
some quiet moments to contrast to the louder scenes, I suggest you respect
that. On the other hand, if you are only going to watch the movie through
a cheap pair of PC speakers, DRC might not sound such a bad idea. For any
other case (including using headphones) stay away from DRC.
VII.
Starting the Conversion
Go to Run-->Start Conversion. Wait for
a few hours, depending on your settings, the length of the video and the
speed of your PC. For example, a 2-hour movie on my Athlon XP
1600+ DDR takes less than 4 hours for a typical 2-pass
conversion with XMPEG.
7.
Audio Conversion
Start VirtualDub. Go to File-->Open
Video File... and open the .avi file created by XMPEG.
First we will extract the audio track in order to normalize
it. This step is optional, but skipping it could result to quiet audio.
Of course, if you already normalized through XMPEG
you don't need to proceed with this step.
Go to File-->Save WAV... and give a filename
for the output file. Make sure you manualy enter .wav as an extension
(e.g. movie.wav).
Start Ecuador's ABC 2. Press the "WAV Normalizer"
button. Press "Open WAV" and select the extracted WAV
file. Press "Scan for Peaks" and when it completes
press "Normalize". The audio file is now normalized
and the final AVI file can be created.
III.
Multiplexing Audio/Video
Again in VirtualDub (with the AVI file loaded) in the
menu "video" select "direct stream copy",
as the video is already compressed. From the "audio"
menu select "full processing mode", then "WAV
audio..." and select the normalized WAV file (If
you haven't extracted the audio, leave the setting to "AVI audio").
Again on the "audio" menu, go to "Conversion...".
Select "44100Hz" and check "High Quality".
Converting to 44100Hz is
recommended only when you use an audio bitrate of up to 128 kbps
in order to improve the quality. If you use at least 160 kbps
skip the conversion settings as the quality will be better with 48kHz
audio.
You can also change the a/v interleaving
settings (audio-->interleaving...). The default is
interleaving every 1 frame (which corresponds to 40 ms
for PAL). You could set it to every 5-10 frames to save
a few MB's off your AVI. I should note that the interleaving
settings affect how well the AVI plays from the CD so, you should experiment
to find out which setting works for you. I won't suggest a setting as
my drive is quite tolerant while I have seen many others who aren't.
Finally, go to "audio"-->"Compression"
and select the "MPEG Layer 3" codec and set it to 128kbps
44.1kHz Stereo.
To create the final AVI, menu "File"-->"Save
As AVI..." and coose the output file.
8.
Splitting the AVI.
If your final AVI fits on one CD then you are finished and
ready to burn it on CD-R. If not, then open it with VirtualDub and I will
explain the 2 CD procedure (You can go for even more CDs of course).
Since the DivX codec is a variable bitrate codec you never
know where exactly to cut the AVI, you can only guess. Ecuador's ABC
2 has a splitting frame calculator that can do the first guess for you.
So, use it and you will have the frames to be deleted in order to create
each of the two (or more) splitted AVI's.
Press "ctrl+G" and enter the frame you want to split the
file at. Splitting can only be done at keframes, so press "Shift-Left"
to move to the previous keyframe and note down the frame number. Press "Home"
to set selection start, move the horizontal slider to the last frame and
press "End" to set selection end. Now press "Delete"
to delete the selected section. Select "Direct Stream Copy"
on both video and audio menus, and save your new avi under
a new name.
For the second segment the procedure is similar but this time set selection
start (Home button) to frame 0 and selection end to one frame
less than the one you noted before (press "ctrl+G" to go
to the frame and "End" to set it as the end of selection).
Press "Delete" and continue as before creating a new AVI.
You could also use the above method
to cut out any parts of the video you do not want (like the credits) in
order to save space.
9.
Playback.
Your MPEG 4 AVI can be played with any media player. However
there are some players specially created for DivX content with many nice features.
I recommend using BSPlayer, downloadable from www.bsplayer.org.
Probably the worst player you could ever use is Microsoft Media
Player 7. If you really want to use a Microsoft Media player then at least
download
Media Player 6.4 which is much better (and lighter) than the newer
version.
10.
Troubleshooting
After a lot of e-mails which I answered separately, I thought
I would add to the guide solutions to the most comon problems. Before anything
else, make sure you have installed XMPEG through my rip-pack.
|
Problem
|
DivX codec cannot be found on the XMPEG codecs list.
- or -
The movie loads in XMPEG but the program crashes when I start the conversion,
regardless my settings.
|
|
Solution
|
You can either uninstall and delete the entire XMPEG folder
from your hard disk (and then re-install it), or delete just the "Profiles"
and "Settings" subfolders (after exiting XMPEG of course). This
way all XMPEG settings are reset. A common mistake people do to end up
with this situation is selecting a final resolution that does not follow
the "multiples of 16" rule. |
|
Problem
|
Encoding ends with an error at 50% (that is the start of the second
pass).
|
|
Solution
|
Check to see if your output files and DivX "log",
"mv" files are saved to a valid folder on your hard disk. Try
using a FAT 32 partition under Win XP, or disable the DivX "mv"
file. |
|
Problem
|
Win 98 (or Win Me) resources drop as XMPEG is converting. Windows become
unresponsive. In some cases the encoding finishes, but other programs
cannot run the same time.
|
|
Solution
|
There is a recource leak with the "compression tracer"
window that does not affect Win 2000/XP. Do not close "compression
tracer", rather click on one of its icons to change the view to the
video stats or log views. Then you can either leave or close the window.
Repeat at 50% when the window pops up again. |
|
Problem
|
XMPEG error under Win XP:
An error ocurred when trying to generate the file.
Check that you're not using the output file or the program is setup
correctly.
|
|
Solution
|
I have never encountered this one (except when I actually
use the output file...), so I have not tested the solution, but I have
been told that in this case you need to update the Microsoft Movie Maker
(through Windows Update) and associate the .avi extension with the Windows
Media Player. |
|
Problem
|
XMPEG problems with audio codecs under Win XP (and sometimes Win
9x)
|
|
Solution
|
Again, this is a problem that I have not tested, but for
some the installation of the TSUNAMI
codec pack has solved the problems. For others, deleting or disabling
duplicate audio codecs through the control panel was the solution. |
11.
Contacting the Author.
You can always visit my homepage: www.ecuadors.net.
Send me an e-mail: legacy@ecuadors.net
You can also find me on the Greek irc (GR Net). Connect to one
of the servers (e.g. phoenix.irc.gr, nana.irc.gr) and find me after midnight
local time (Eastern European - GMT +2) by the nickname "Ecuador"
(usually I' m on the Physics University of Athens students channel: #fysiko).